 3 Comments


Advanced Listing Optimization Know-How
In this episode, we cover the following topics:
- Changes to our listing
- Handling our hijackers
- Dealing with negative reviews
- Advanced listing optimization with Listing Builder
- Setting up Enhanced Brand Content
- Missed an episode? See them all here.
We’re covering all of this today in our 16th episode of the Million Dollar Case Study. Watch the video, keep reading and don’t forget to subscribe to our Million Dollar Case Study email list, so you never miss an episode!
Before you get started, if you’re not already using Jungle Scout, you will need to get a Jungle Scout subscription to follow along with us and complete your product research.
Welcome Back to the Million Dollar Case Study!
Today, we’re going to talk about listing optimization and setting up enhanced brand content. But first, an update of our Jungle Slider keyboard tray; let’s see how well it’s selling.
Updates to our listing.
If you recall, in episode 15 I mentioned that I initially bootstrapped our product photography. However, I then decided to have a professional retake the photos, since images play a huge role in conversion rates.
Pro Tip: If you’re looking for an expert photographer, head on over to Jungle Scout Market to find vetted freelancers.
Here are the final results of that effort:
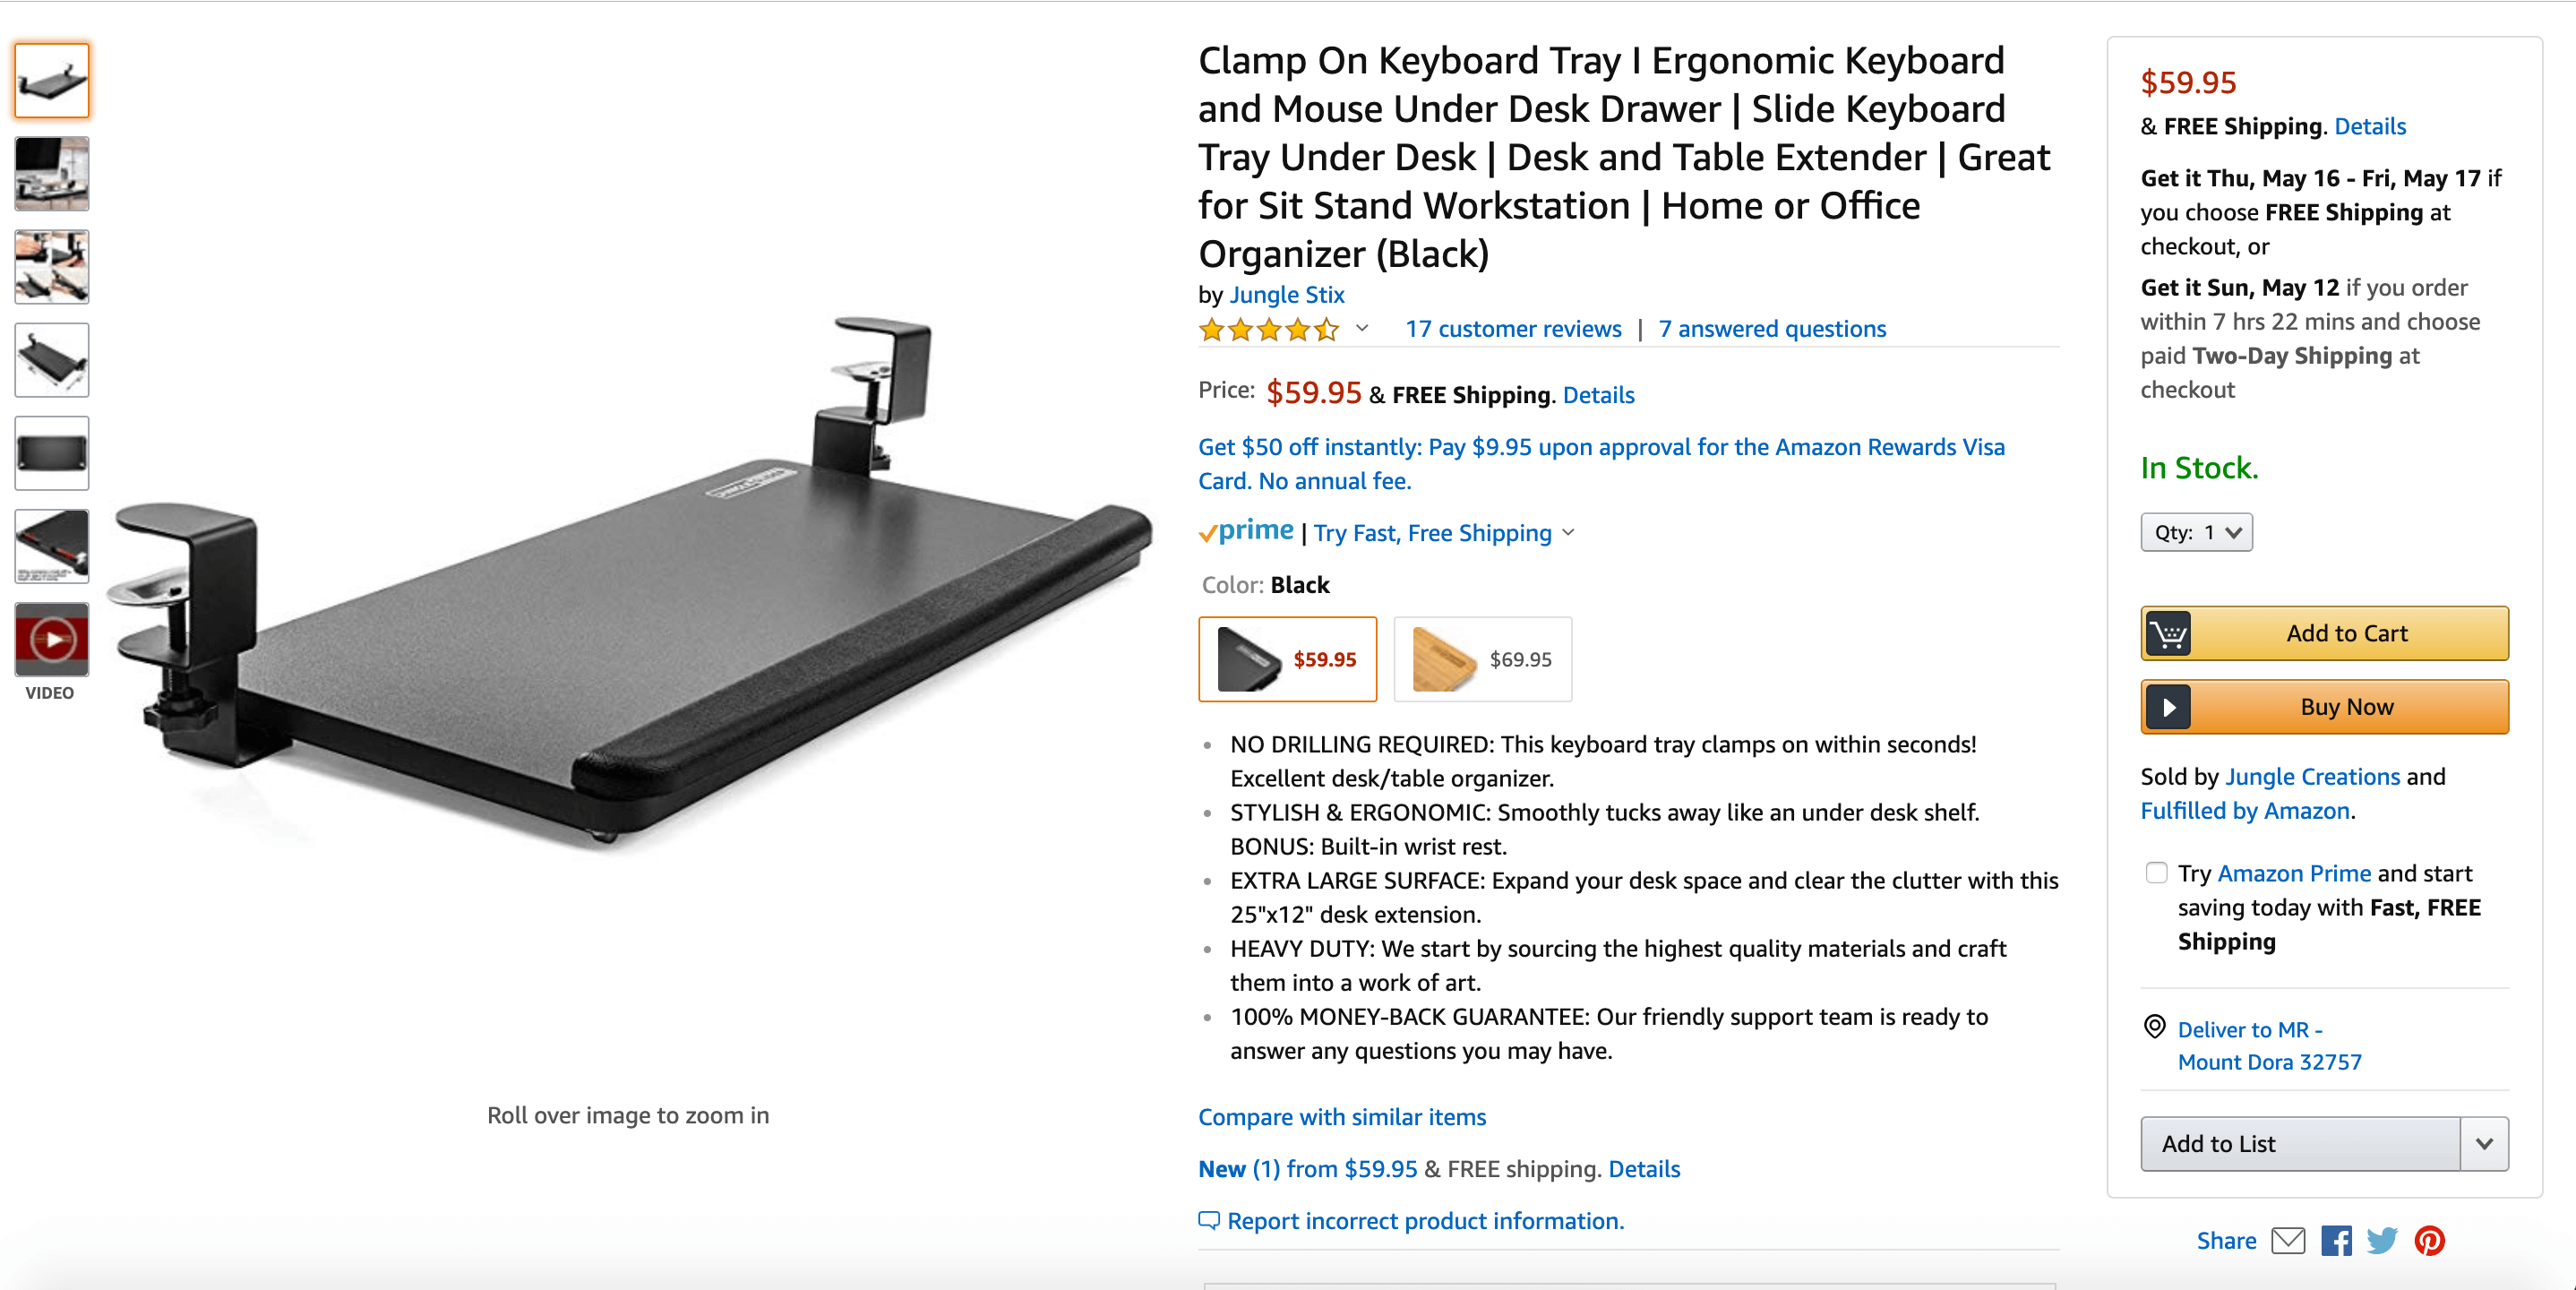
Main image
A product’s main image is the most important visual on your listing. It’s the most prominent feature shown to customers as they browse Amazon.com.
Now, I know some sellers try to get creative, adding props such as a desk or a table (simply look at our competition). However, we didn’t want to violate Amazon’s Terms of Service, so we set the main image to a solid white background, as pictured below.
I also asked our photographer to take multiple pictures, from a variety of angles. That allowed me to split test the different shots with Splitly (more on that at the end of this blog post) to see which angle generated the most conversions.
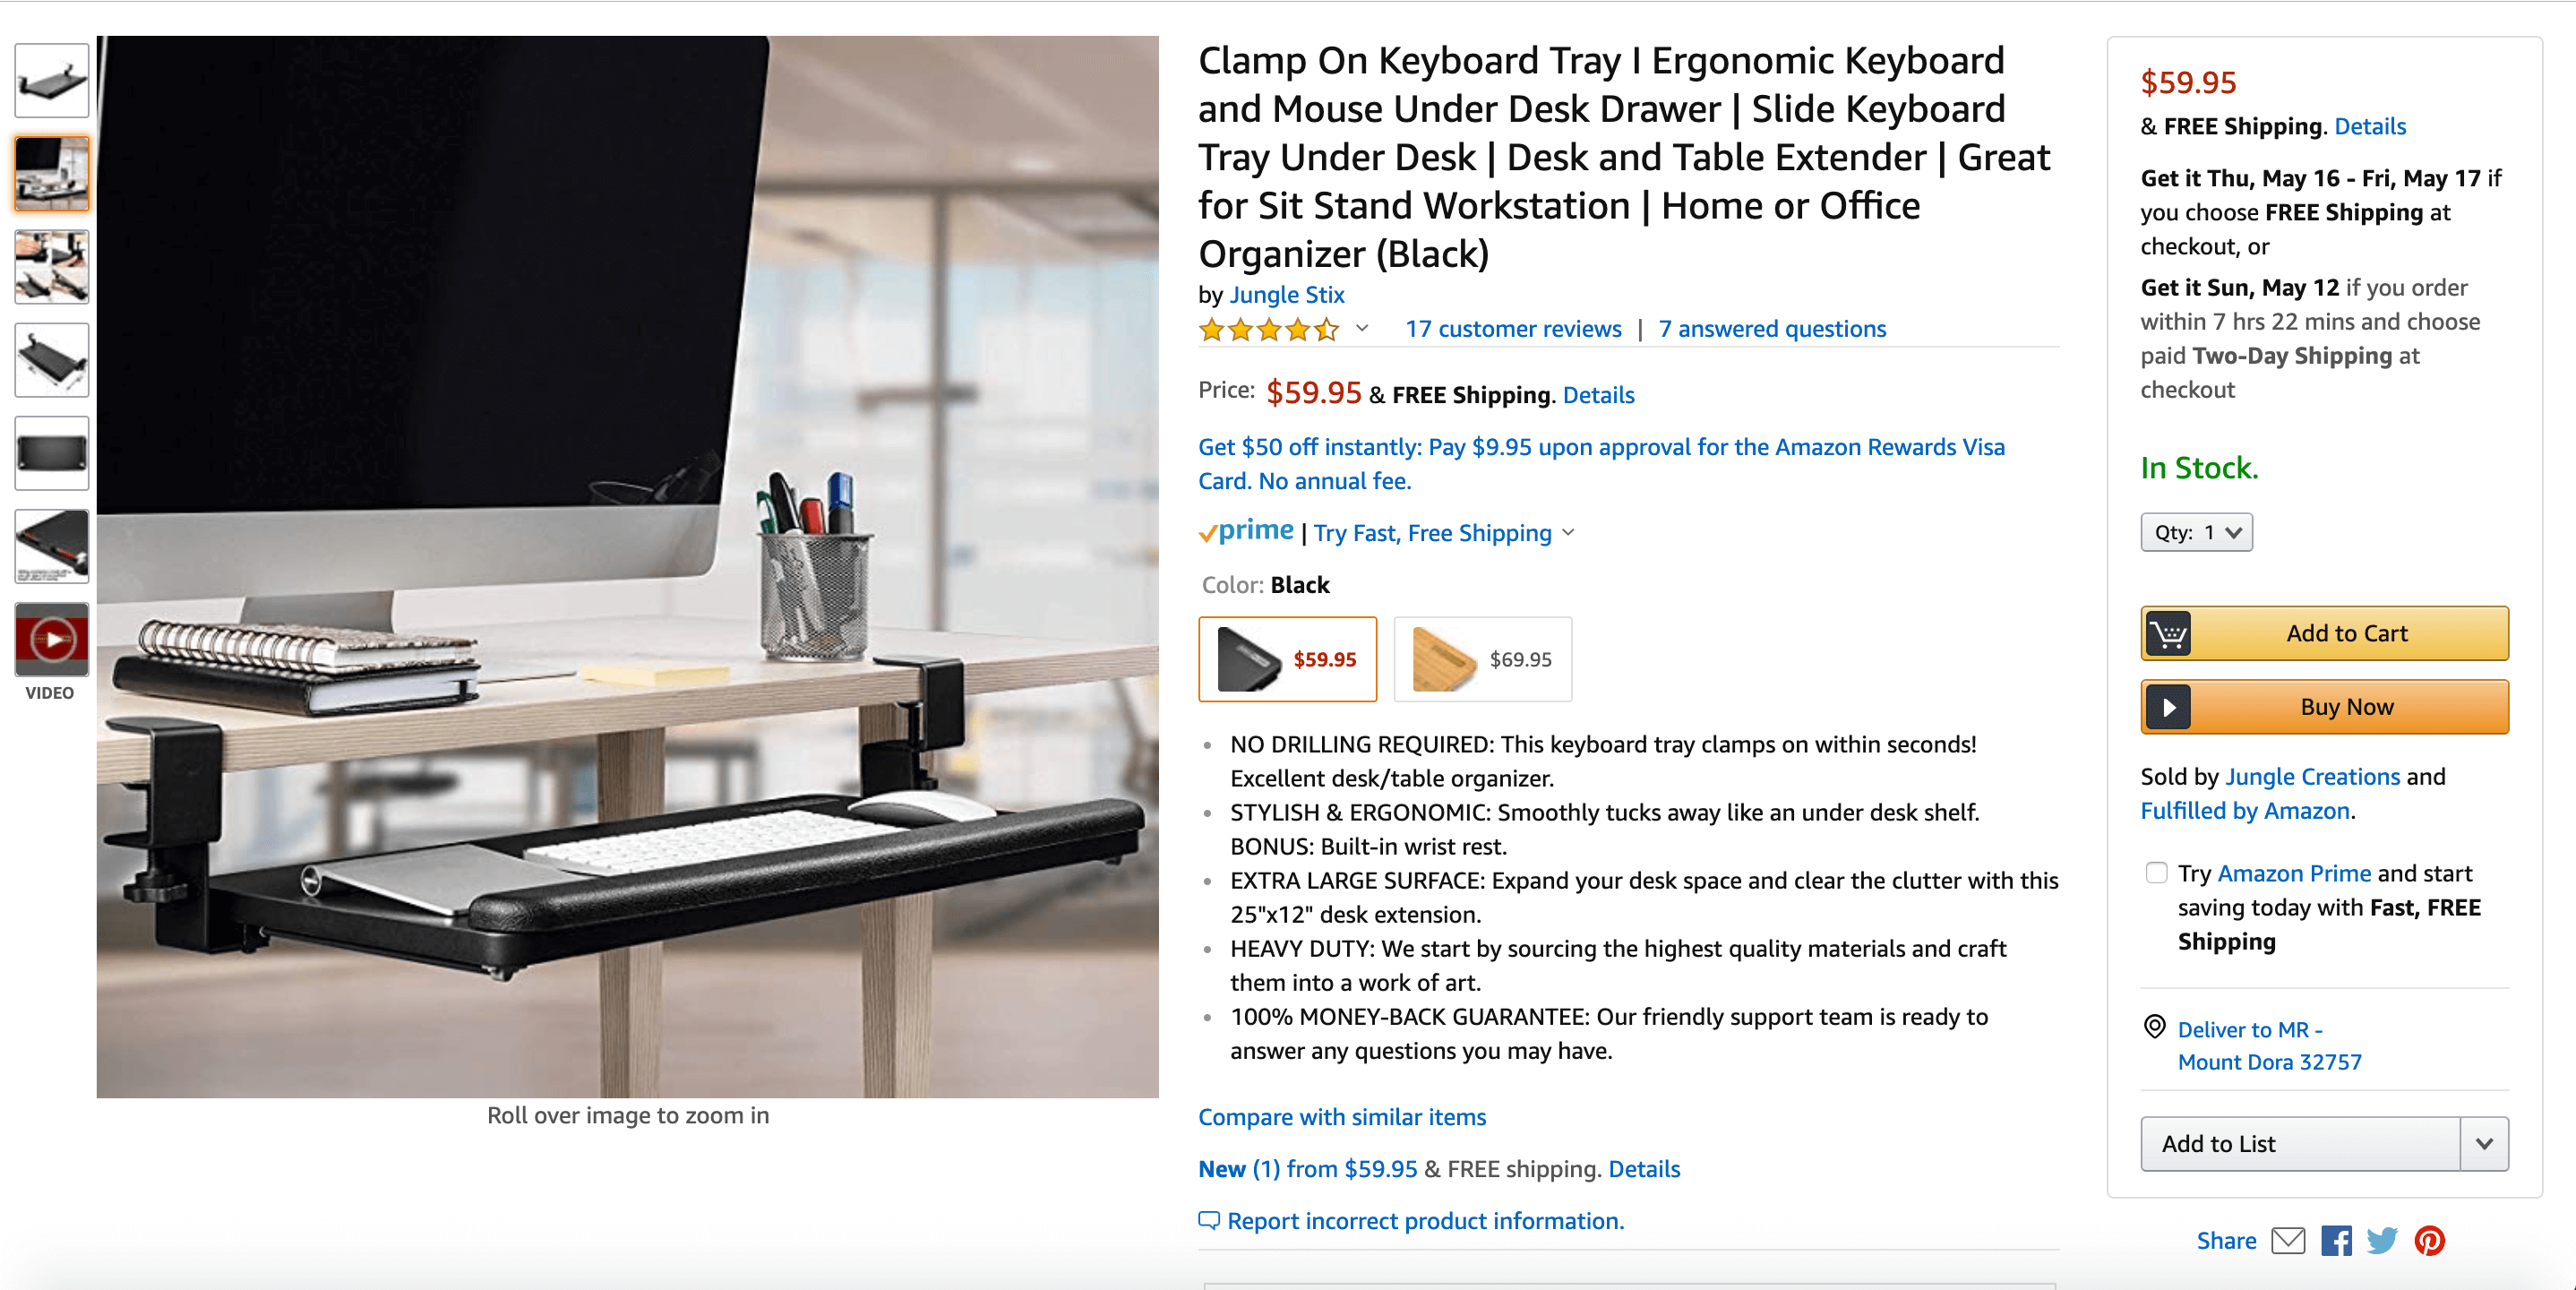
Lifestyle photo
As for the lifestyle photo, the photographer displayed the Jungle Slider in an office environment. Frankly, considering this is our target audience, that made sense. Plus, outside of the main image, we can take more creative liberties with our product photography.
The idea is to tell a story that resonates with your customer through your images. Ask yourself:
- Who’s my target (age, gender, profession, etc.)?
- What are their major pain points as it relates to this product?
- How am I solving their problem(s)?
Once you know the answers to those questions, you can create a story that relays that information to your buyers. As the saying goes, “A picture is worth a thousand words,” and indeed it is!
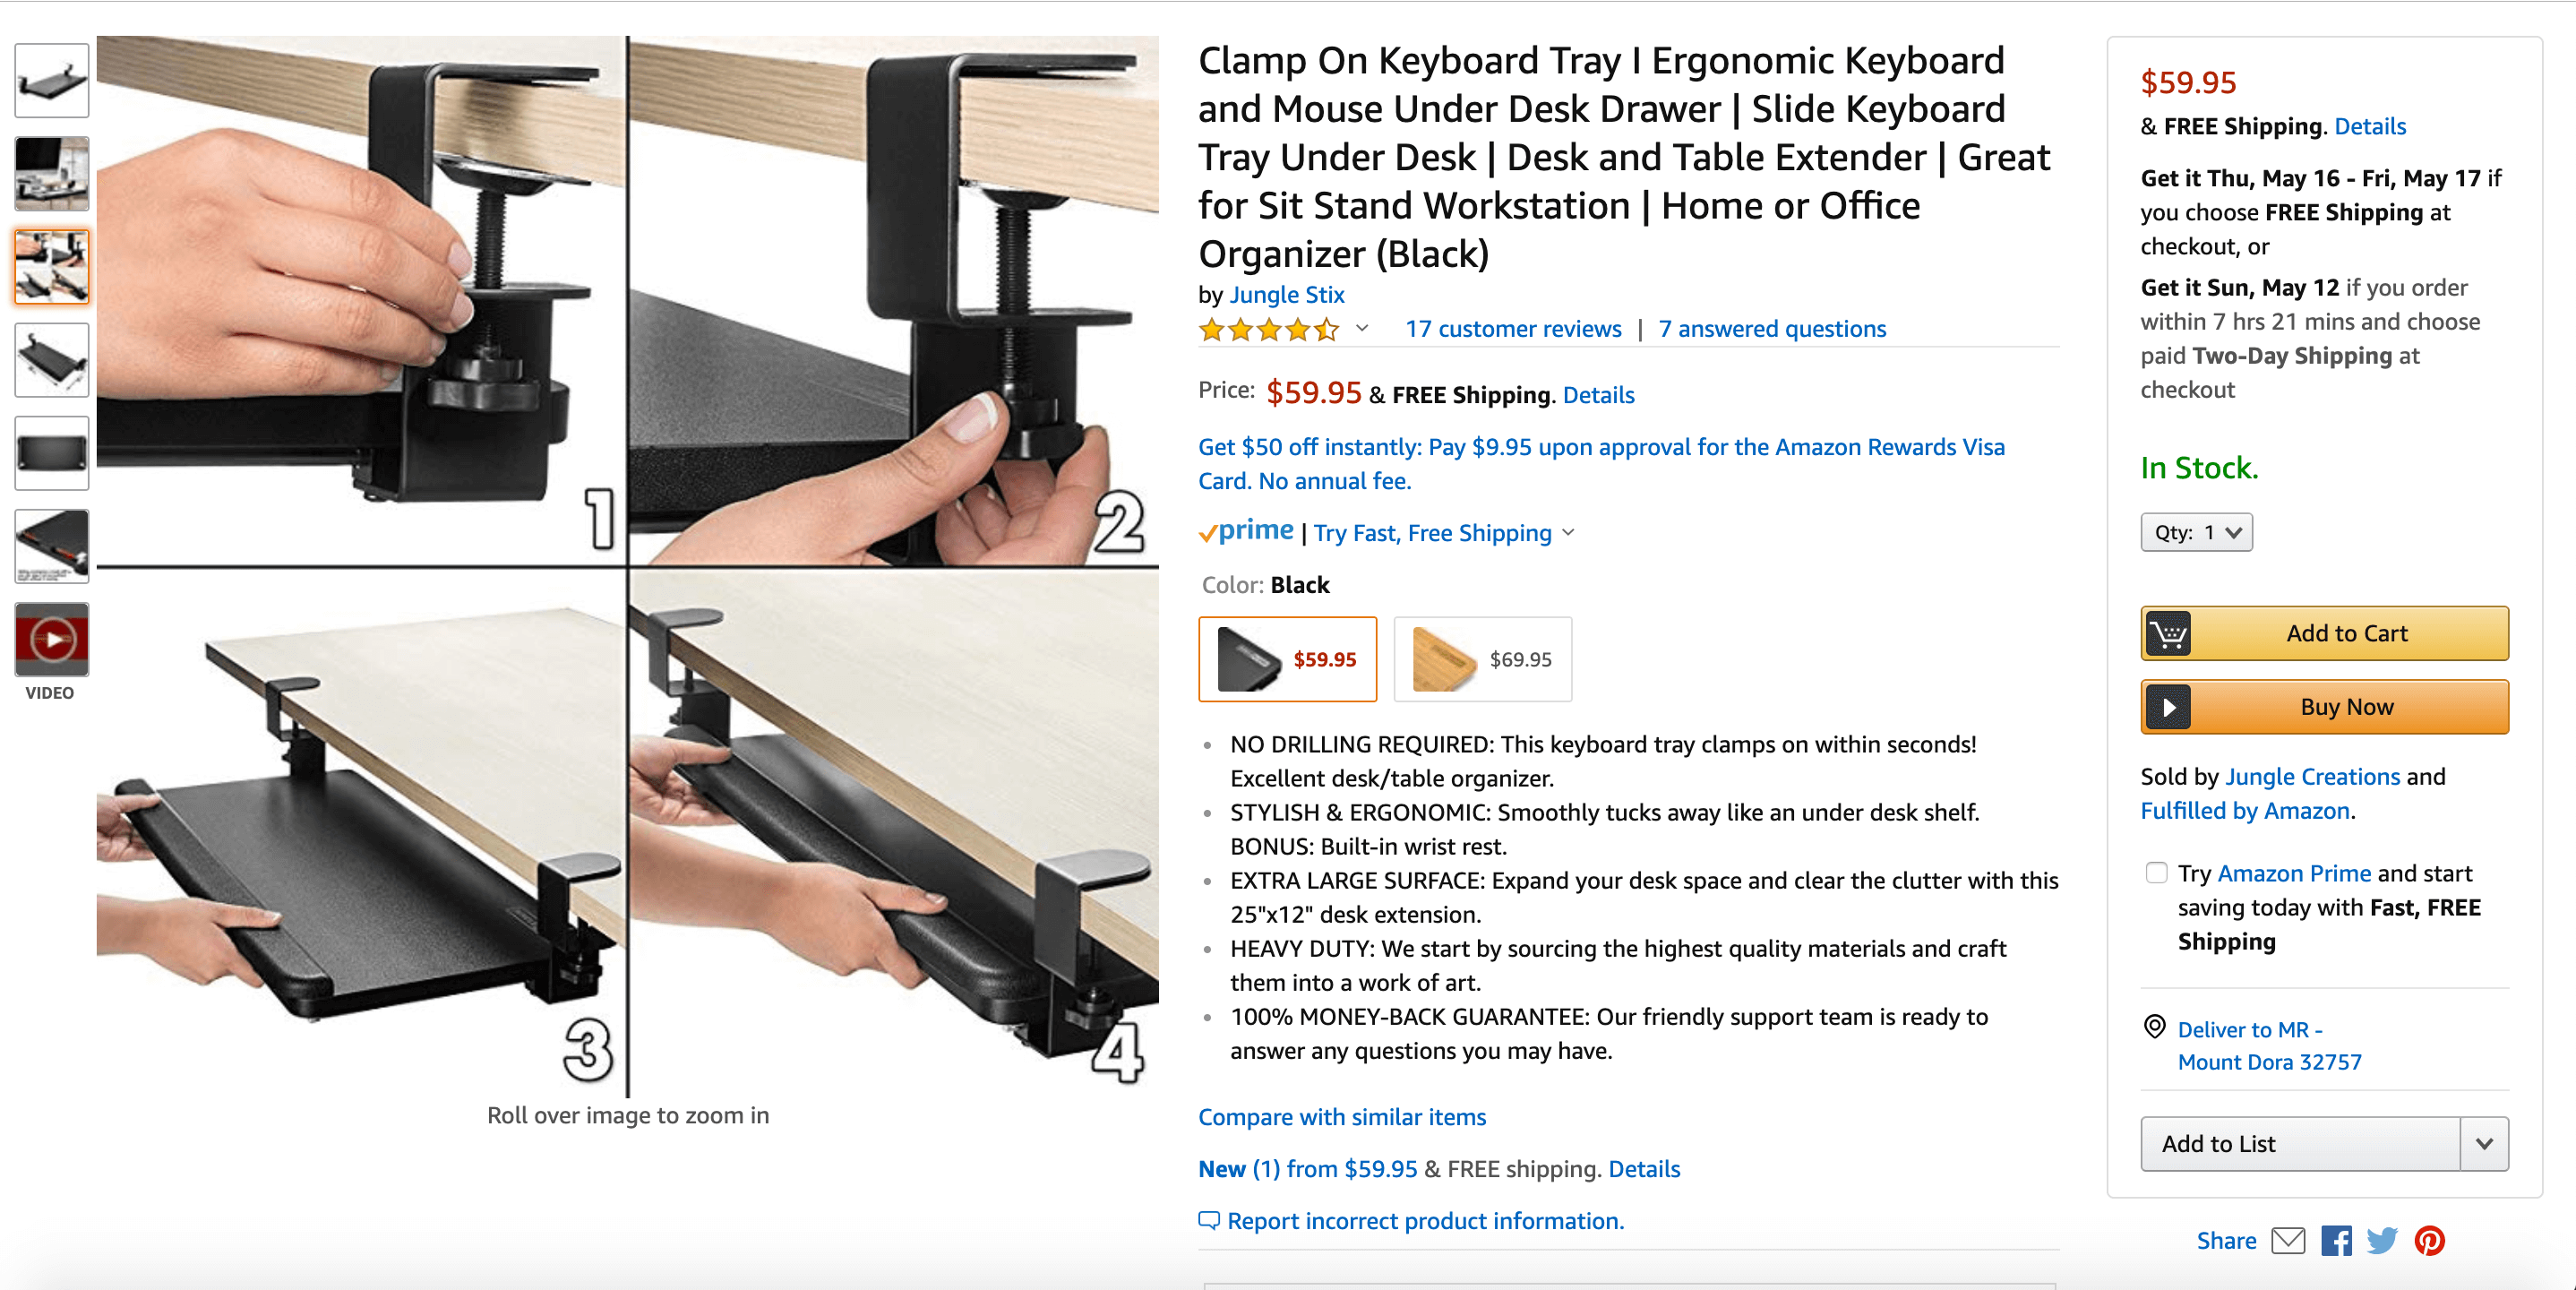
Infographic photo
When it comes to infographics, the objective is to show users either the benefits of your product, how to use the item, or both.
With our image, we wanted to show customers how simple it is to install the Jungle Slider (touching on their pain points). It’s as easy as one, two, three!
Additional images
One of the challenges I encountered early on was that customers found the sliding mechanism to be a bit firm. This could have escalated quickly, becoming a big problem.
So how did I fix the issue? Simple! Prior to their purchase, and via the product photos, I told our customers that the stiffness of the sliding mechanism was intentional. It’s meant to lock the Jungle Slider into position.
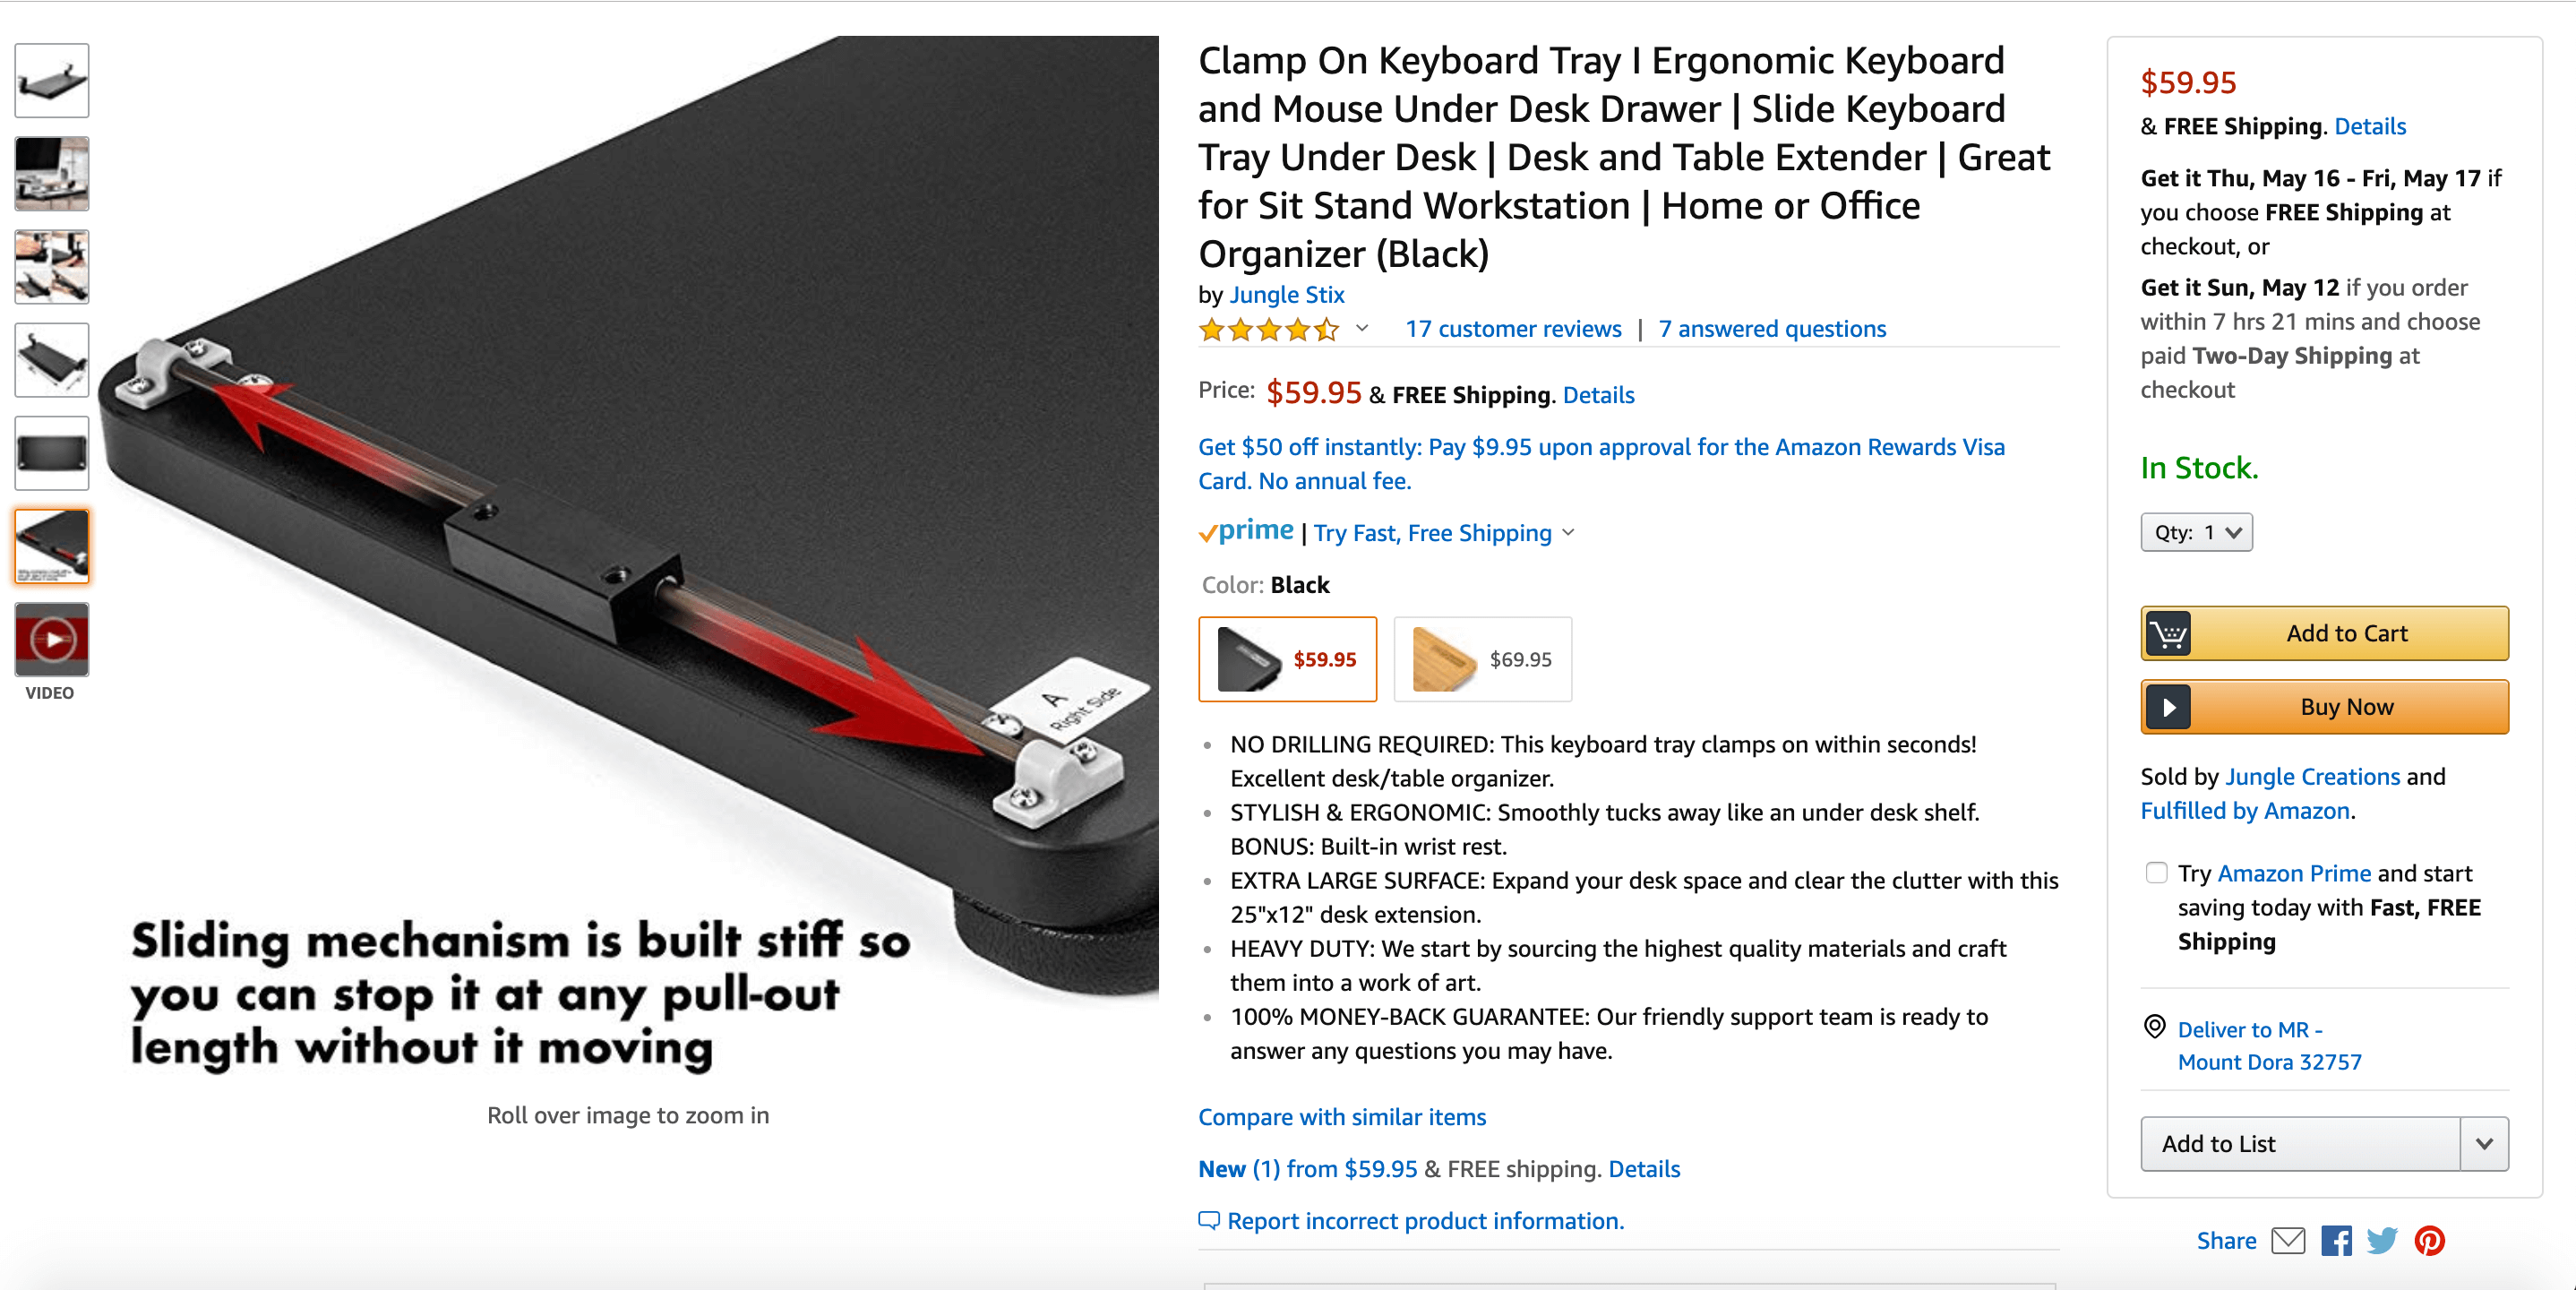
In addition to the pictures listed above, I also included a picture that shows the product dimensions. It highlights our patented slider rail technology as well.
Ultimately, you to get seven solid product photos, as that’s what a desktop computer displays on the left margin when shopping on Amazon.com. And while it’s true you’re allowed nine images, only seven will be shown when a customer lands on your listing initially. For that reason, seven high-quality pictures is all you need. Since the remaining photos aren’t visible, they are, therefore, non-converting.
Lastly, if you’re Brand Registered, I strongly recommend uploading a demo video of your product in lieu of your seventh image. A video has a greater impact on your potential buyers, so switching out one of your pictures for the demo is worth it.
How are our sales?
For about a month now, our Jungle Sliders have been for sale.
Our black MDF (medium density fiberboard) Jungle Slider has moved 92 units so far, while we’ve sold 95 of the bamboo variants in that same time frame.
In total, that’s 187 Jungle Sliders. And overall, that’s pretty good.
With an original target of 300 units per month (which averages out to about ten per day), we’re about two-thirds of the way to our goal. And I definitely think there are additional tactics we can use to grow our sales even further.
Handling our hijackers.
One thing that blocked us from reaching our 300 unit goal was the fact that our listing was hijacked.
Unfortunately, when you’re doing giveaways you risk giving your product to shady characters who in turn re-sell it on your listing at the full retail price. And though no one intends to give hijackers access to their discounted products, sometimes these individuals slip through the cracks.
If this happens to you, please don’t panic!
I’m here to tell you that hijackers aren’t as big a deal as you might think. Eventually, they will run out of inventory, and when that happens, you’ll own the listing once again. All you have to do is wait them out and continue on with your launch strategy.
So while our hijackers did take one, two, or maybe three sales away from us, those sales aren’t a major problem. They may have gotten a few sales, but we got close to 200!
Dealing with negative reviews.
Something else that hurt our sales early on were the two one-star reviews we received.
Looking at the reviews objectively, it looks like one may have been written by a competitor. It’s an unverified purchase and they claim that the clamp and the slider broke. Considering we used cast iron for the Jungle Slider, that comment on that particular review seems kind of fishy, right?
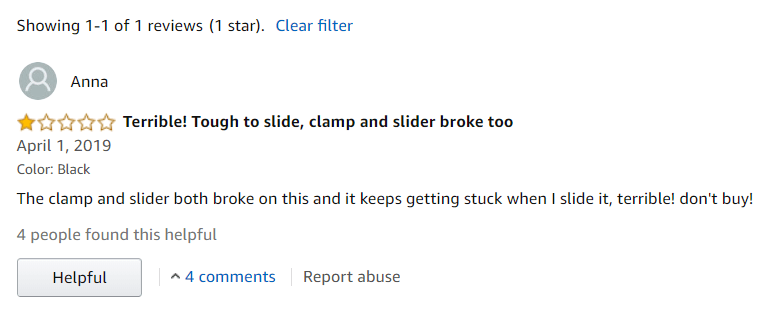
But we can’t let a negative review get us down. Besides, when it’s a fake review, there’s nothing we can really do about it. However, the other negative review looked legit, as it was a verified purchase.
To see if I could solve the customer’s issue, I first had to find the order associated with the reviewer. I did this by:
- Looking at the comments and getting the name attached to the one-star review.
- Once I could identify the customer, I went over to Seller Central’s ‘manage orders’ section.
- Based on the date of the review, I looked for purchases made one to two weeks earlier.
- Finally, I matched the name of the reviewer to the name of one of the transactions made during the time frame above.
- Once I had the order number, I was able to reach out to the reviewer using Amazon’s Buyer-Seller Messaging system.
Offer help, but don’t mention their review
I didn’t email them to ask them to remove their review though. Instead, I asked if there was something I could do to make the slider work for them. Was there some added value I could deliver? I genuinely wanted to make them happy, and if they happened to change their review because of my customer support, all the better!
Just to reiterate, if you get a bad review, don’t email the customer to ask them to remove it. Rather, you want to email them to say, “Hey! I think you might have had a less than desirable experience with my product. Is there anything I can do to help you with this issue you faced?”
And if you’re not able to solve the problem, offer them a full refund (again, this is without mentioning anything about their review). There’s a good chance they’ll respond to your goodwill by saying, “Thank you. I’ve edited my review to reflect the outstanding customer service.”
In our case, the buyer didn’t even edit their review. They just straight-up removed it! Definitely the best-case scenario.
So even if you think a negative review was written by a competitor, reach out to everyone who leaves a bad review. Offer your help and add value. The people who really bought your product will respond.
Amazon’s Early Reviewer Program.
While we’re on the topic of reviews, I noticed that we’ve gotten a few from Amazon’s Early Reviewer Program. Those reviews are tagged with an early reviewer rewards badge, right next to verified purchase.
If you aren’t familiar with the program, check it out. Here’s how it works:
- First, you pay $60 to be entered into the program.
- Next, when a verified buyer purchases your product, Amazon sends them an email requesting that they leave a review.
- If the buyer posts a review, they can get a $1 to $3 Amazon gift card.
- Amazon will repeat the process until your product receives five reviews.
Essentially, you’re paying $60 to get five reviews. In my opinion, it’s $60 well spent.
Listing Builder.
But we have 18 reviews for the Jungle Slider, and only three of those are from the Early Reviewer Program. What really took us to the next level was Jungle Scout’s Listing Builder.
When I was creating the demo of our listing, it was very wordy, redundant, and lacking in keywords. But, by using listing builder, I was able to create the listing you now see up on amazon.com. This is how I created a keyword-rich listing:
- To start, I clicked on ‘create new listing’ in the Listing Builder.
- Then I selected the list of keywords I had already created using Keyword Scout.
- After hitting ‘next’, Listing Builder pulled in my list of keywords.
- From there, I used those keywords to create my title, bullets, description, etc., sorting by the keywords’ search volume.
Another reason why Listing Builder makes it so easy to build your listing is that it shows you which keywords you’ve already used (once you’ve used a keyword, Amazon understands they should rank you for that keyword, so it’s unnecessary to use a keyword multiple times). Also, as you build out your listing, the tool shows you how many characters you have remaining for that particular section of your listing.
Basically, the Listing Builder makes life easier by doing much of the heavy lifting for you automatically.
Amazon’s Brand Registry.
As I’ve said before, when it comes to your product you always want to tell your potential customers a story. Whether it’s through photos or your listing’s copy, you want your buyers to know what your item is all about. How will it make their lives easier, better? Why should they buy your product and not your competition’s?
So how do you tell your story AND stand out? One way to do that is to register your product in Amazon’s Brand Registry. Once registered, you’ll have access to the program’s enhanced brand content (EBC), along with other great features.
Enhanced Brand Content
And EBC lets you do more than just add visually rich content, it also lets you:
- use Amazon’s listing templates;
- add images within your product description section;
- section off your content into logical chunks of information;
- add subheadings, paragraphs, bold, italics, underlined text and bullet points.
After you’ve created your listing using EBC, you will have to submit it for review. This can take anywhere from one to eight days, and you may not get approved the first time around.
Don’t get discouraged though! Using EBC effectively can help grow your business by increasing traffic to your page, increasing your conversion rates, and increasing sales.
Brand Analytics
One of the other benefits of Amazon’s Brand Registry is getting access to its Brand Analytics.
You can find it under the ‘Report’ section of your account, and when you click on the ‘Brand Analytics’ option, it gives you data for the brands you have associated with the Brand Registry.
A couple of the cool things you can learn from Brand Analytics are:
- the rank of all Amazon search terms; right now, Bluetooth headphones is actually the most popular search term on Amazon.
- item comparisons; we can see what other items customers looked at, similar to our own product, after visiting our product detail page.
Video uploads
As I mentioned earlier, one of the other features of the Brand Registry is the ability to upload and manage videos for your listing. It’s located under the ‘Inventory’ tab in your Seller Central account. You can see which videos you’ve uploaded, or upload a new video and associate it with a specific listing.
Right now, that’s all that’s in this section. However, rumor has it that Amazon is going to provide analytics about sellers’ videos in the future. So you may soon get data regarding buyers’ watch times, and when people typically fall off from your video.
At the end of the day, the more time people spend on your listing the better. And having a video is a great way to extend the time customers browse your product’s page, giving them more information up front, and increasing your chances of conversion.
Split testing with Splitly.
Lastly, to further optimize your listing, I recommend running split tests on either the title of your listing, its images, and/or its price. The easiest way to do this is by using a software like Splitly.
Because we wanted to improve the Jungle Slider’s product page, we decided to split test our main image. I won’t walk you through all the details about how to set up one of these split tests though, since you can set up a test in about one minute.
Once the split test is up and running, Splitly automatically rotates the images (or title, price, etc.) you’re testing every 24 hours. It repeats the process until statistical significance is reached and a definitive winner between the two options can be declared. And you decide what’s most important to you:
- Sessions
- Sales
- Conversion Rate
- Daily Profit
Something to keep in mind when you launch a split test is that you should only test one component at a time. Also, I recommend either testing the listing’s main image or its price. Those tend to be the AB tests with the highest impact. So, after you’ve run one test and determined the winner, run the winner again against a different photo or price (whatever it is you’re testing).
Conclusion.
Hopefully, you now have a clear idea of what it takes to create a highly optimized listing, and how to set up enhanced brand content.
As for action items for this week, start using the Listing Builder to create your listing and, if you haven’t done so already, start the application process for your trademark. The sooner you have a trademark, the sooner you can become a part of Amazon’s Brand Registry.
Thanks very much for tuning in, and please don’t forget to give us a thumbs up and subscribe! Looking forward to seeing you next week.
Stay tuned…
In next week’s episode, we’ll be covering how to optimize your PPC campaigns. In the meantime, keep crushing it, Freedom Builders!
Start selling on Amazon today
Your Amazon success starts with Jungle Scout.
We donate 100% of our product proceeds to Pencils of Promise.
They build schools in developing countries to help children get access to the education they need to build a strong foundation and future for themselves.
We love doing the Million Dollar Case Study. It’s a team-wide effort and we value every opportunity it gives us to connect with sellers like you!
Missed an episode? See them all here.